Party Machine
Music, lights, and bubbles at your fingertips
Command Center
by Aleenah and Jackie
The command center is enclosed in a geodesic half-dome with 2 status lights and two LCDs on the base. The center uses XBees to communicate with the remote systems, which include the bubble maker and glove. After receiving data about the statuses, the command center has one LCD that displays status updates in real time about the different components of the bubble machine and glove. There is a button on the enclosure that can be pressed to alternate between these statuses, and the RGB LED lights change based on the component status being shown.
The different screens and statuses are as follows:
-
Prompt Screen (white): Prompts the user to push the button to cycle through different screens. Displays the text “Press Button to View Status.”
-
Power On/Off (green): Displays the power setting of the bubble machine, either on or off.
-
Gesture (red): Displays the type of gesture being performed by the glove. There are two distinct statuses: “No Gesture” when the glove is at rest and “Jitterbug” when the glove is moved quickly in one direction. “No Gesture” does not affect the bubble machine, while “Jitterbug” causes the bubble machines to rotate back and forth.
-
Bubble Machines/Mode (aqua): Displays how many bubble guns are in use, which is either 0, 1, or 2.
-
Light Color (purple): Displays (in words) the current color of the LED lights on the bubble machine. Colors displayed include red, orange, yellow, green, blue, purple, and white. If no color is present, the screen displays “None.”
-
Light Mode (blue): Displays the LED light pattern on the bubble machine. Lights can have the following patterns: always on, movie theater, flashing, random, and none.
-
LED brightness (yellow): Displays the brightness of the LEDs on the bubble machine. Brightness is measured on a scale of 0 to 100, which is represented by a bar with a length proportionate to the brightness value. If the brightness value given is 0, the screen displays “No Light.”
The command center also plays music that starts once a user presses a button on the dome, from a different Arduino. A second LCD displays the title of the current song, which is played using an MP3 shield that uses a micro-SD card with songs on it in an MP3 format. The shield is also connected to an external speaker for audio output. The music component was added for fun as we thought it would create a party atmosphere.
Software Approach
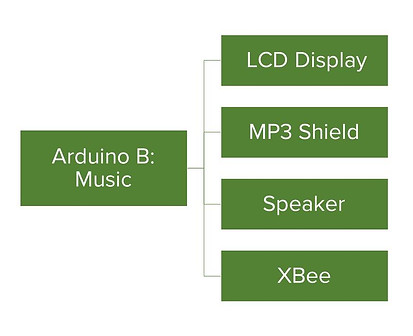
The Command Center is designed to be a standalone object. Because of this, we decided to display status updates on the dome rather than on the computer screen, even though the dome must be connected to the computer to use the XBees and to draw power. The Command Center is composed of two parts: the Status component, and the Music component. Both the Status and Music components are wired to the same breadboard to save space, though they are completely separate from one another and use two different Arduinos.
The Status component of the Command Center has the following components: 2 RGB LED lights, 1 button, and 1 LCD display. As mentioned above, different statuses of the remote sites are displayed on the LCD display. To look through the different status screens, a user can push the button, causing the screen content and the color of the accompanying LEDs to change.
Formatted status updates are sent from the remote sites to the Command Center, where they are parsed and stored in variables. Those variables are then used by the Command Center to display the status information of the entire system. The software makes use of an “Update” approach, which eliminates the need for the delay() function. This way, elements of the code can be updated with new information, or parts of the system can be changed without constantly refreshing the LCD screen, which tends to blink if updated too constantly. Instead, different parts of the system, including the LCD screen, are only updated when a change occurrs, such as the press of a button, or a new status update.
The Music component is simple, and is composed of the MP3 shield, a button, an LCD display, and an external speaker. The button is used as a trigger to start the music, and the LCD displays the current song being played. Initially, the LCD would also display the song title and artist name-- however, due to limited memory space, those could not be included without overwhelming the Arduino.
The entire system is housed in a geodesic icosahedron dome with a height/radius of 4.5” made from a series of cardboard triangles. The dome is both aesthetically pleasing and functional--components such as the LCD screens, buttons, and LED lights are attached to the outside of the structure, with the wires threaded through openings made by the intersections of the triangles composing the dome. The dome was also spray-painted gold to add to the party atmosphere.
The code is available as a PDF here:
Block diagrams of the Arduinos in the Command Center
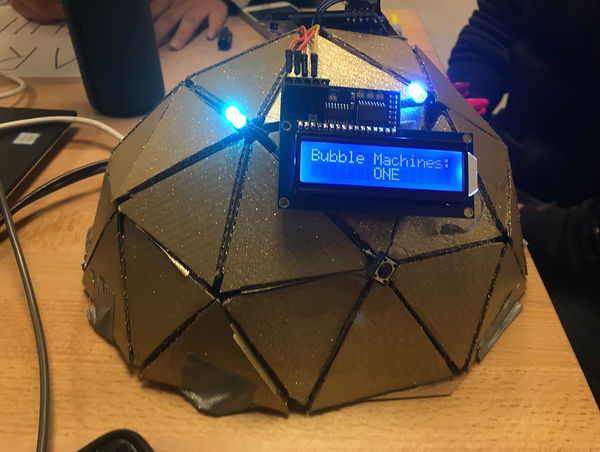
The LCD on the enclosure displays statuses about the other two components including the current gesture, amount of bubble machines being used, light color, light mode, and LED brightness.
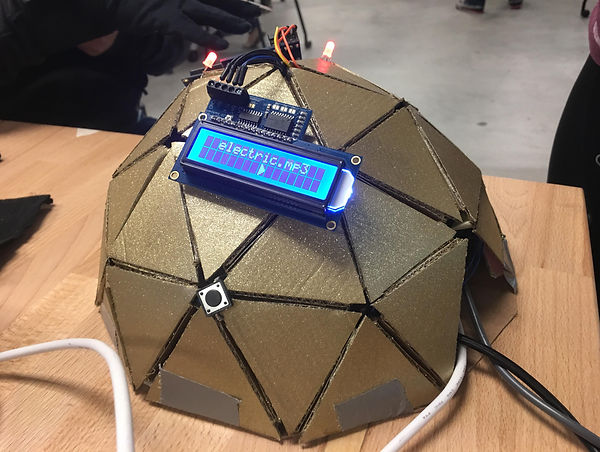
One LCD displays the name of the song file with a play button. The button below it is used to start playing the music and can restart the playlist once it has ended.

Process
We like that this project gave us the creative freedom to come up with our own system that had many moving parts that would work together, and we really enjoyed seeing what other student groups came up. We’re glad that other people thought that our idea was unique and offered a fun experience for anyone who likes bubbles, lights, and music. We particularly enjoyed building the geodesic enclosure because it made the project more visually appealing.
Overall, we thought this project was successful, but we wish it worked more reliably. If we had more time for this project, we could spend more time testing the communication between the command center, bubble machine, and glove so we could ensure that our party machine created a cohesive experience for users. Based on feedback from other students, we realized that our music portion was not connected with other components of our system. If we had more time, we could integrate the music component of the command center with the glove and bubble machine so it would respond to a certain glove motion or be synchronized with the bubbles.
Resources
-
Arduino Lesson 6. Digital Inputs (for the button code)
-
Multi-tasking the Arduino - Part 1 (for running everything at the same time)
-
Geodesic Dome Notes & Calculator (for the dome)